Live Photos are a wonderful feature that captures 1.5 seconds of video and audio before and after you take a picture, bringing your memories to life with movement and sound. Since Apple introduced it in 2015, these dynamic images have become a popular way to capture special moments with added context and emotion.
While Live Photos are great for viewing in your Photos app, converting them to videos makes them more versatile for sharing across platforms and devices. So how to turn a live photo into a video? — This guide will show you multiple methods that cater to different skill levels and needs, and explore more on turning a static photo into a video.

In This Article
How to Turn a Live Photo Into a Video
01 Method 1: Using the Photos App (iPhone/iPad)
In fact, converting Live Photos to videos directly in your Photos app is the quickest and easiest method that requires no additional downloads or purchases.
You can follow these simple steps:
1. Open the Photos app on your iPhone or iPad.
2. Find and select the Live Photo you want to convert.
3. Swipe up on the photo to reveal the Media Types options.
4. Tap on "Save as Video".
5. Your new video will be automatically saved to your Recently Saved album.
It's that simple! The best part is that your original Live Photo will remain intact in your Live Photos album, so you'll have both versions available.
02 Method 2: Using Third-Party Apps
If you're looking for more editing options or want to combine multiple Live Photos into a single video, third-party apps can offer additional features and flexibility.
Popular apps for converting Live Photos to videos include:
- Lively: Offers the ability to convert Live Photos to GIFs or videos.
- IntoLive: Provides options to adjust video length and add effects.
- CapCut: Free tool with advanced editing capabilities.
- Flixier: Online editor that allows you to enhance your videos with additional editing options.
Using CapCut as an example:
1. Download and install CapCut from the App Store.
2. Import your Live Photo into the app.

3. Use the editing tools to trim, crop, or add effects.
4. Choose export settings (resolution, quality).
5. Save the finished video to your device.
These apps are particularly useful when you want to add special effects, transitions, or combine multiple Live Photos into a single cohesive video.
03 Method 3: Using iMovie (for Advanced Users)
For those who want more control over their video output, iMovie provides a robust set of editing tools that can transform your Live Photos into polished videos.
Here's how to use iMovie:
1. Open iMovie on your iPhone or iPad.
2. Create a new project.
3. Select the Live Photo(s) you want to include.
4. Arrange the photos in your desired order.
5. Add transitions, text, and music if desired.
6. Export the finished project as a video.
This method is ideal for creating video slideshows from multiple Live Photos and adding professional touches like music, titles, and transitions.
How to Turn a Static Photo Into a Video - Easy Steps
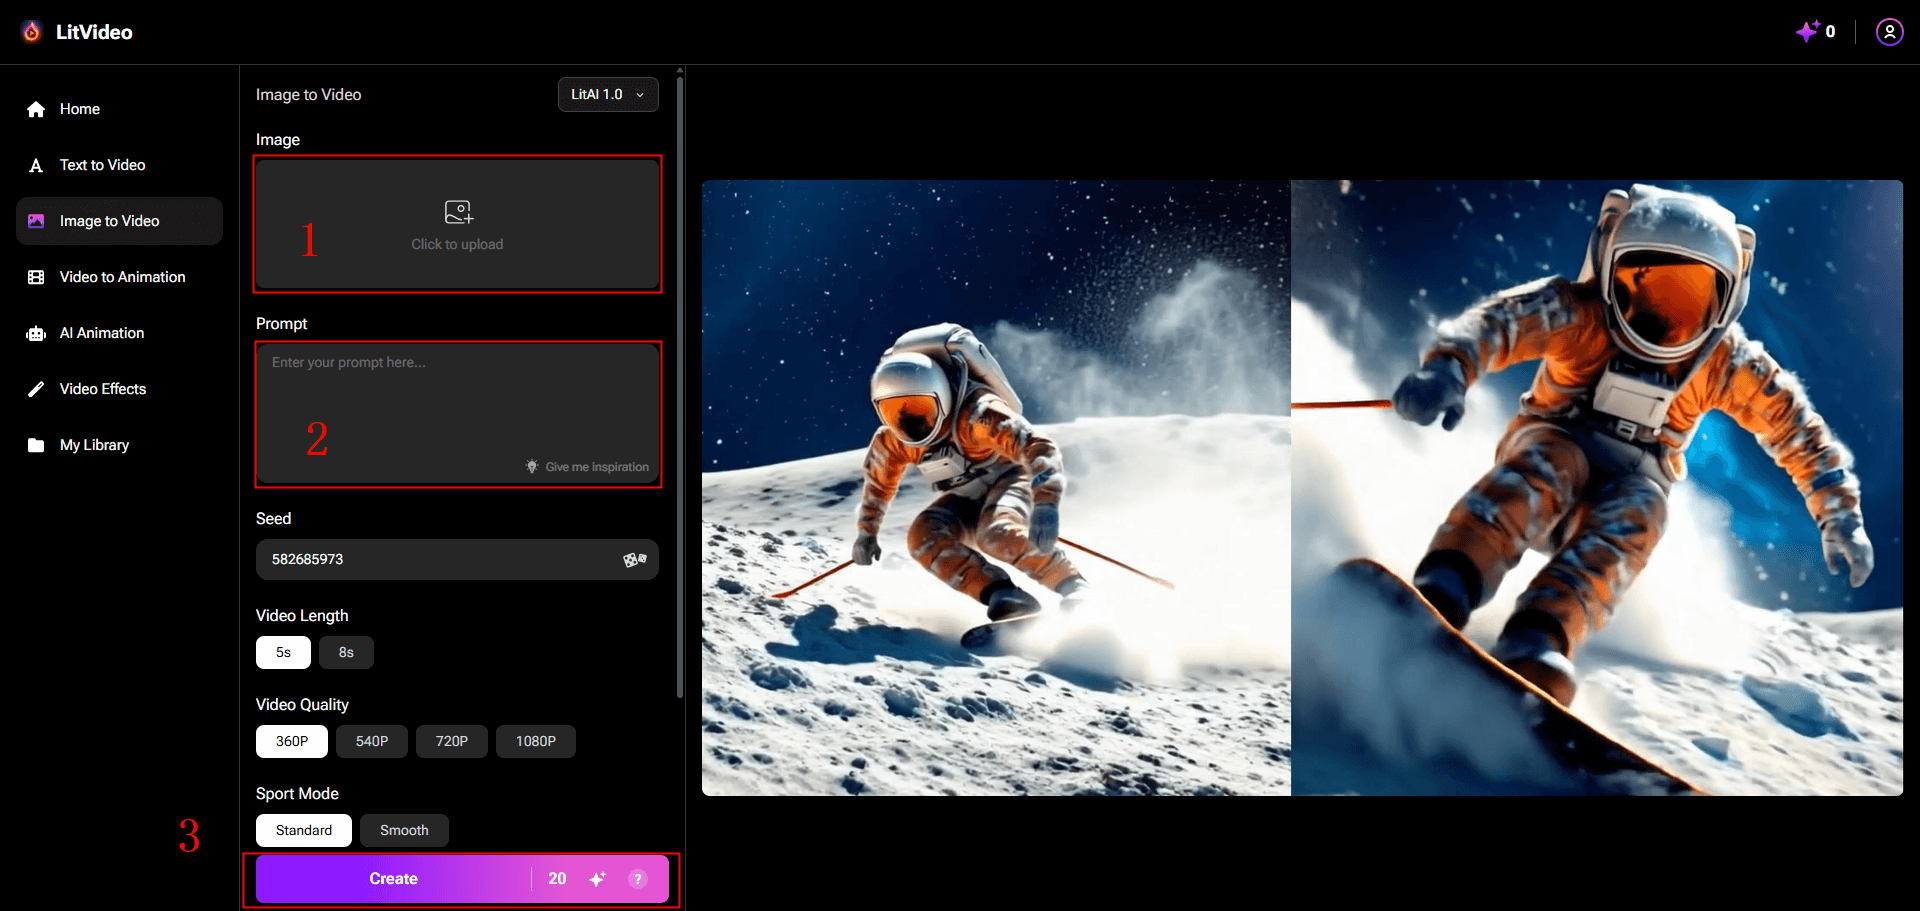
Not all photos are Live Photos, but that doesn't mean you can't turn them into engaging videos. With AI-powered tools like LitVideo, you can transform any static image into a dynamic video. LitVideo is a powerful AI video generator, offering online features like AI image to video, text to video, video to animation, and AI cartoon design.
Here's how to use LitVideo's Image to Video feature:

LitVideo and similar AI video generators offer the following advantages:
- No technical skills required - just upload and describe.
- Quick processing times - usually ready in seconds.
- Professional-looking results without expensive software.
- No watermarks on the output videos.
- Free credits to test the service.
This technology is perfect for marketing professionals, content creators, and anyone looking to add movement to their static images without animation skills.
Tips and Tricks for Turning a Photo Into Video
To help you get the most out of your photo-to-video conversions, here are some expert tips and tricks:
01 Quality Considerations
| Aspect | Tip |
|---|---|
| Resolution | Choose the highest resolution available (720p or higher) for best results. |
| Duration | For social media, 5-10 seconds is often ideal. |
| File size | Be mindful of compression when sharing; higher quality means larger files. |
| Format | MP4 is the most widely compatible video format for sharing. |
| Lighting | Photos with good lighting convert best to videos. |
02 Creative Enhancement Tips
- Add sound effects or music to complement your video's mood.
- Experiment with different motion styles - some AI tools offer various animation options.
- Combine multiple photos into a slideshow for a storytelling effect.
- Use the Loop or Bounce features on iOS 11+ to create fun special effects with your Live Photos.
- Consider the platform where you'll share the video and optimize accordingly (square for Instagram, vertical for TikTok, etc.).
Remember that visual media plays a vital role in audience engagement today, making the ability to convert photos to videos an important skill for effective communication.
What People Ask
01 Why can't I save my live photo as a video?
If you're having trouble saving a Live Photo as a video, there could be several reasons:
- Your iOS version may be outdated - this feature works best on modern iPhones and iPads.
- You might be trying to convert a regular photo instead of a Live Photo.
- Your device storage could be full, preventing new videos from being saved.
Make sure you're using iOS 11 or later, and verify that the photo you're trying to convert is actually a Live Photo by looking for the "LIVE" indicator in the upper left corner of the image.
02 Can I make a video from pictures on my iPhone?
Yes, you can easily create video slideshows from multiple photos on your iPhone using the built-in Photos app or iMovie.
To create a slideshow using the Photos app:
- 1. Open Photos and select the images you want to include.
- 2. Tap "Select" and choose all desired images.
- 3. Tap "Add To" and create a new album.
- 4. Use the Memories feature or iMovie to convert this album into a video.
This is a great way to compile vacation photos, event pictures, or any collection of images into a cohesive video story.
03 How can I convert multiple Live Photos into a single video?
To combine several Live Photos into one continuous video, you have a couple of options:
- 1. Use iMovie - Import all your Live Photos into a new project and arrange them in sequence.
- 2. Use a third-party app like CapCut or Flixier that supports multiple photo imports.
- 3. Create an album of Live Photos and use the iOS Memories feature to auto-generate a video.
This capability is particularly useful for creating a continuous story from a series of moments captured as Live Photos.
Conclusion
Converting Live Photos to videos opens up new possibilities for sharing and preserving your special moments. With this tutorial, it's believe that you now have all the tools you need to transform your photos into engaging videos. What photo will you transform into a video first? The possibilities are endless!


